
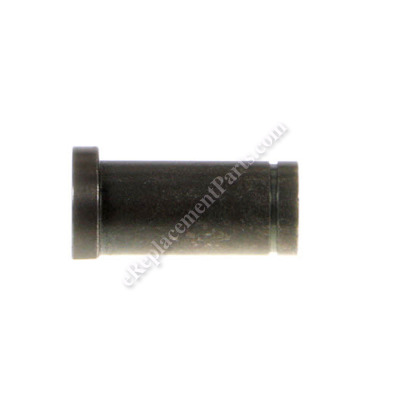


This is a genuine manufacturer-approved replacement part which is specially designed for use with Bosch table saws. This bushing helps to provide spacing between connected parts, please make sure to refer to the appropriate diagrams of your model for the correct location and application of this hardware. Keep in mind this high-quality item is made of durable metal and is sold individually.
Bushing 2610997221
OEM part for: Bosch
Part Number: 2610997221
$5.19
In Stock
Jump To:
Frequently Purchased Together ?


Compatibility
This part will fit the following 12 machines
Bosch
4000 (0601476139) Table Saw View Diagrams & Manuals
4100 (0601B13010) Table Saw View Diagrams & Manuals
4100DG-09 (0601B13010) 10" Worksite Table Saw View Diagrams & Manuals
4100DG-09 (3601L13010) 10" Worksite Table Saw View Diagrams & Manuals
4100-09 (0601B13010) 10" Worksite Table Saw View Diagrams & Manuals
4100-09 (3601L13010) 10" Worksite Table Saw View Diagrams & Manuals
4000 (0601476260) Saw Table View Diagrams & Manuals
4100 (3601L13010) Table Saw View Diagrams & Manuals
4100 (3601L13011) Table Saw View Diagrams & Manuals
4100 (3601L13012) Table Saw View Diagrams & Manuals
4100XC (3601L13014) Table Saw 4100xc View Diagrams & Manuals
4100XC (3601L13015) Table Saw, 10-Inch, Bare Tool Tw Ul62841 View Diagrams & Manuals
Show More Compatible Models
This item works with the following types of products:
- Saw Parts
- Table Saw Parts
Customer Part Reviews ?
Average Rating (out of 5):
Click to filter by ratings:
5 stars
1
4 stars
0
3 stars
0
2 stars
0
1 stars
0
< PREV
- 1
Great OEM part for a 4000 Bosch TS
It arrived in perfect Shae as all parts I've ordered from this seller.
Guest -
April 25, 2023
Verified Purchase
t
t
t -
t days ago
Verified Purchase
eReplacementParts Team
t
Questions & Answers ?
Our customer Service team is at the ready daily to answer your part and product questions.

Ask our Team
We have a dedicated staff with decades of collective experience in helping customers just like you purchase parts to repair their products.
Does this fit my product?Questions & Answers for Bushing
It looks like this requires a C-Clip but I don't see one for it in the parts diagram. Does it need a C-Clip?
Michael
for model number Bosch 4100
asked on 2023-03-29
Hello Michael, Thank you for your inquiry. There is actually a c-clip listed for it, part# 2610998573. We hope this helps.
eReplacementParts Team March 29, 2023
Customer Repair Instructions ?
All our customer repair instructions are solicited directly from other customers just like you who have purchased and replaced this exact part.
Wouldn’t start
Roddy - February 16, 2024
Tool Type
Table Saw
Difficulty
Easy
Time
15-30 minutes
Tools Used
Screwdriver, Na
Parts Used
Used screw driver to remove housing and replaced the bushings
Did you find this story helpful?
Thanks for voting and helping fellow customers!
The saw blade would not raise or lower and toothed gears were stripped.
Anker - August 24, 2017
Tool Type
Table Saw
Difficulty
Hard
Time
More than 2 hours
Tools Used
Screwdriver, Power Drill, Socket set, Wrench Set, Snap ring pliers, roll pin punch
1. Put the saw on the work bench and remove the stand with 10mm sockets.
2. Loosen the angle adjustment.
3. Remove the raise/lower wheel, with a screwdriver and an Allen wrench.
4. Stand the saw up on an edge and support with two one gallon paint cans.
5. Remove two phillips screws supporting horizontal bracket axle. Slide the axle back to release the toothed gear.
6. Use a roll pin punch and remove one pin, out of the way don't lose them, from each gear.
7. Remove two 10mm jam nuts from the end of the vertical axle.
8. Use an Allen wrench to move the Allen stop screw out of the way of the bushing. Move the motor to the bottom of its stroke, channel locks maybe needed and you might bust your knuckles.
9. Use snap ring pliers to remove snap ring from top of the bushing. Tap or pull vertical axle and bushing out of the motor.
10. Slide motor up to top of stroke and remove the vertical axle and bushing.
11. Overbore the vertical axle support bracket with 13/16 or 5/8 bit, I forgot. Just enough to slide new threaded rod through the bracket.
12. Use graphite spray lubricant and flood the threaded rod, several sprays. Move motor up to top of stroke, insert threaded rod through overbored bracket, thread bushing on to the rod. Place bushing into seat on the motor.
13. Reinstall the snap ring, reset the Allen stop screw on the side of the bushing. Reinstall new toothed gear on the threaded rod. Loosely install the two 10mm jamb nuts on the end of the threaded rod.
14. Install the new toothed gear on the horizontal axle. Reinstall the raise/lower wheel, you need to give it a good push to get the center screw to start. Reset allen stop screw.
15. Reinstall the two screws on the horizontal bracket. This is the were the finesse comes in. The horizontal bracket adjusts the horizontal gear relative to the vertical gear. Don't make it too tight or too loose. Lock down the two phillips screws when you are satisfied.
16. Move motor to bottom of the stroke and then lock down the jamb nuts. Again it needs some finesse. The tightest spot for the jamb nuts is at the bottom of the stroke.
17. Move angle stop back to 0 degrees and lock down. Check the movement by raising and lower the motor several times until happy with the motion.
18. Reinstall the stand. Get back to work.
Did you find this story helpful?
Thanks for voting and helping fellow customers!
OEM stands for Original Equipment Manufacturer and means the part you’re buying is sourced directly from the manufacturer who made your product. At eReplacementParts, we sell only genuine OEM parts, guaranteeing the part you’re purchasing is of better design and of higher quality than aftermarket parts.
Our product descriptions are a combination of data sourced directly from the manufacturers who made your product as well as content researched and curated by our content & customer service teams. This content is edited and reviewed internally before being made public to customers.
Our customer service team are at the ready daily to answer your part and product questions. We have a dedicated staff with decades of collective experience in helping customers just like you purchase parts to repair their products.
All our part reviews are solicited directly from other customers who have purchased this exact part. While we moderate these reviews for profanity, offensive language or personally identifiable information, these reviews are posted exactly as submitted and no alterations are made by our team.
All our customer repair instructions are solicited directly from other customers just like you who have purchased and replaced this exact part. While we moderate these reviews for profanity, offensive language or personally identifiable information, these reviews are posted exactly as submitted and no alterations are made by our team.
Based on data from past customer purchasing behaviors, these parts are most commonly purchased together along with the part you are viewing. These parts may be necessary or helpful to replace to complete your current repair.
All our installation videos are created and produced in collaboration with our in-house repair technician, Mark Sodja, who has helped millions of eReplacementParts customers over the last 13 years repair their products. Mark has years of experience in selling and repairing both commercial and residential products with a specialty in gas-powered equipment.
This data is collected from customers who submitted a repair instruction after replacing this exact part. Customers can rate how easy the repair was to complete and how long it took. We aggregate this data to provide a repair rating that allows customers to quickly determine the difficulty and time needed to perform their own repair.