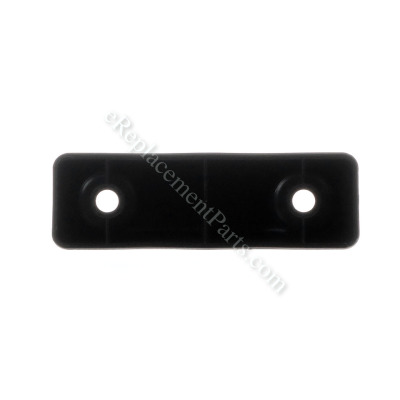


This is an original part from the Ryobi manufacturer. The durable, plastic bumper is compatible with several table saws. This part is fastened onto the side of the table, and has been designed to help protect the table. This item is sold individually. A screwdriver is needed for the repair.
Bumper 0131010224
OEM part for: Ryobi, Ridgid
Part Number: 0131010224
$4.99
In Stock
Jump To:
Frequently Purchased Together ?

Compatibility
This part will fit the following 4 machines
Ryobi
BTS20 10" Portable Table Saw View Diagrams & Manuals
BTS20R 10" Table Saw View Diagrams & Manuals
BTS20R-1 10" Table Saw View Diagrams & Manuals
Ridgid
R4516 Table Saw View Diagrams & Manuals
This item works with the following types of products:
- Saw Parts
- Table Saw Parts
Customer Part Reviews ?
Average Rating (out of 5):
Click to filter by ratings:
5 stars
1
4 stars
2
3 stars
0
2 stars
0
1 stars
0
< PREV
- 1
Easy replacement and perfect fit
Needed these for some time and they were a perfect fit and exact replacement.
Guest -
November 21, 2020
Verified Purchase
Worked as expected , wishing it was some better then then original
Arrive day before i expected, perfect fit
Guest -
December 17, 2021
Verified Purchase
Simple to order; inexpensive and easy install.
By providing pictures adjacent to the equipment description, I was able to easily order the correct parts. Once they arrived, they easily installed, making the equipment safe to use once again.
I intend to buy more parts for other tools/equipment in the future.
Guest -
April 21, 2020
Verified Purchase
t
t
t -
t days ago
Verified Purchase
eReplacementParts Team
t
Questions & Answers ?
Our customer Service team is at the ready daily to answer your part and product questions.

Ask our Team
We have a dedicated staff with decades of collective experience in helping customers just like you purchase parts to repair their products.
Does this fit my product?Questions & Answers for Bumper
No questions have been asked yet
Customer Repair Instructions ?
All our customer repair instructions are solicited directly from other customers just like you who have purchased and replaced this exact part.
broken bumper
Jeff - September 26, 2021
Tool Type
Table Saw
Difficulty
Easy
Time
Less than 15 minutes
Tools Used
Screwdriver
Parts Used
right part, timely delivery. fair porice
Did you find this story helpful?
Thanks for voting and helping fellow customers!
Table saw bumper replacement
Michael - November 29, 2020
Tool Type
Table Saw
Difficulty
Easy
Time
Less than 15 minutes
Tools Used
Screwdriver
Parts Used
1. Set-up table saw.
2. Thread one screw through bumper.
3. Align bumper/screw with correct screw hole and tighten.
4. Thread second screw through bumper.
5. Align bumper/screw with correct screw hole and tighten.
6. Project finished.
2. Thread one screw through bumper.
3. Align bumper/screw with correct screw hole and tighten.
4. Thread second screw through bumper.
5. Align bumper/screw with correct screw hole and tighten.
6. Project finished.
Did you find this story helpful?
Thanks for voting and helping fellow customers!
Missing a support foot/bumper that stables the saw when it is folded up and on its wheels.
Patrick - April 15, 2018
Tool Type
Table Saw
Difficulty
Easy
Time
Less than 15 minutes
Tools Used
Screwdriver
Parts Used
Just screw it on with the 2 screws I purchased separately.
Did you find this story helpful?
Thanks for voting and helping fellow customers!
1 of the 2 bumpers for the folding table saw broke off and a screw was lost.
Alan - April 14, 2017
Tool Type
Table Saw
Difficulty
Easy
Time
Less than 15 minutes
Tools Used
Screwdriver
Parts Used
Replaced missing screw and bumper
Did you find this story helpful?
Thanks for voting and helping fellow customers!
Worn out blade nut, broken bumpers, missing blade nut wrenches.
Jorge - March 31, 2017
Tool Type
Table Saw
Difficulty
Easy
Time
Less than 15 minutes
Tools Used
Screwdriver, Wrench Set
Removed and replaced broken plastic bumpers with screwdriver.
Installed new blade nut using the new wrenches.
Installed new blade nut using the new wrenches.
Did you find this story helpful?
Thanks for voting and helping fellow customers!
Table edge bumper broke
Robert - March 9, 2017
Tool Type
Table Saw
Difficulty
Easy
Time
Less than 15 minutes
Tools Used
Screwdriver
Parts Used
Replace the missing bumper which required only two screws.
Did you find this story helpful?
Thanks for voting and helping fellow customers!
Plastic bumpers and power cable mgr. ears broke off
Douglas - August 8, 2016
Tool Type
Table Saw
Difficulty
Easy
Time
Less than 15 minutes
Tools Used
Screwdriver, Power Drill
Very easy installation, removed screws from the old parts and installed the new parts with the existing screws.
Did you find this story helpful?
Thanks for voting and helping fellow customers!
Tight space where switch is mounted.
Rob - November 22, 2015
Tool Type
Table Saw
Difficulty
Hard
Time
15-30 minutes
Tools Used
Screwdriver, Pliers, Head mounted flashlight (needle nose plyers)
Make sure you have removed the machine from its power source before starting! Tip the Ryoby portable tablesaw onto wheel side of machine to gain easy access underneath and behind front part of switch. Put on forehead mounted flashlight for a clear view of all wires connected to the back of switch before removal because space is tight and not easily seen without illumination. Also both hands are needed for replacement of switch. Remove the four screws on the front of the switch using a Philips screwdriver. When the screws have been removed tip the switch in and towards the bottom of the machine to remove the wiring harness cover and the wires from the terminals. If you have large fingers, long needle nose pliers are recommended for this step. The switch has four terminals with two white wires on the left side and two black wires on the right side. Mark the two bottom wires white and black with electrical tape (after wiring harness cover has been removed) because it will be hard to determine which wires went where when installing the new switch. Marking the wires is important for proper rewiring of the switch. Reverse these steps for re installation. You may encounter difficulty reinstalling the screws into the front of the switch. I recommend you start with the screws closest to the bottom of the switch. Good luck!
Did you find this story helpful?
Thanks for voting and helping fellow customers!
OEM stands for Original Equipment Manufacturer and means the part you’re buying is sourced directly from the manufacturer who made your product. At eReplacementParts, we sell only genuine OEM parts, guaranteeing the part you’re purchasing is of better design and of higher quality than aftermarket parts.
Our product descriptions are a combination of data sourced directly from the manufacturers who made your product as well as content researched and curated by our content & customer service teams. This content is edited and reviewed internally before being made public to customers.
Our customer service team are at the ready daily to answer your part and product questions. We have a dedicated staff with decades of collective experience in helping customers just like you purchase parts to repair their products.
All our part reviews are solicited directly from other customers who have purchased this exact part. While we moderate these reviews for profanity, offensive language or personally identifiable information, these reviews are posted exactly as submitted and no alterations are made by our team.
All our customer repair instructions are solicited directly from other customers just like you who have purchased and replaced this exact part. While we moderate these reviews for profanity, offensive language or personally identifiable information, these reviews are posted exactly as submitted and no alterations are made by our team.
Based on data from past customer purchasing behaviors, these parts are most commonly purchased together along with the part you are viewing. These parts may be necessary or helpful to replace to complete your current repair.
All our installation videos are created and produced in collaboration with our in-house repair technician, Mark Sodja, who has helped millions of eReplacementParts customers over the last 13 years repair their products. Mark has years of experience in selling and repairing both commercial and residential products with a specialty in gas-powered equipment.
This data is collected from customers who submitted a repair instruction after replacing this exact part. Customers can rate how easy the repair was to complete and how long it took. We aggregate this data to provide a repair rating that allows customers to quickly determine the difficulty and time needed to perform their own repair.