
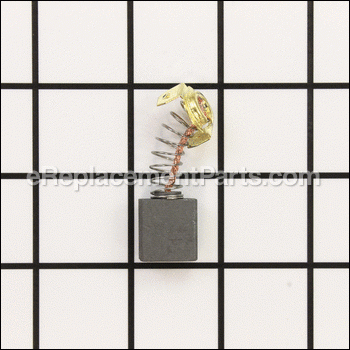


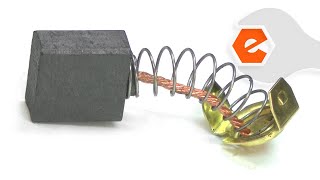
Carbon Brush 1313113
and your part ships today!
| Genuine OEM replacement part This brush is sold individually, 2 are needed for the tools shown below It is always best to replace both brushes, even if only one is worn. Worn brushes frequently are the cause behind a motor running poorly. Carbon brushes are one of the most commonly replaced power tool parts. This is because carbon brushes are wear items, meaning that through friction and use they will gradually wear away until they need replacing. Worn brushes are a common causes of intermittent motor function, reduced electric braking and reduced motor power. A worn-out brush will often be worn down near to the wire lead and can be cracked, pitted, or burned. When replacing carbon brushes, be sure to inspect your armature for burns, cracks, or other damage which can indicate larger motor problems. |


This part is compatible with the following machines:
1400 Type 1 14 inch Abrasive Cut Off Machine
1400 Type 2 14 inch Abrasive Cut Off Machine
1400 Type 2 14 inch Abrasive Cut Off Machine
1400 Type 3 14 inch Abrasive Cut Off Machine
PC305TP Type 1 12 inch Planer
22-540 Type 2 Planer
22-560 Type 1 Planer
22-560 Type 2 Planer
22-565 Type 1 Planer
22-580 Type 1 Planer
20-150 Type 1 Cut Off Saw
TS300 Type 1 Bench Table Saw
TS300 Type 1 Bench Table Saw
34-670 Type 1 10 Inch Table Saw
34-670 Type 1 10 Inch Table Saw
34-670 Type 2 10 Inch Table Saw
34-670 Type 2 10 Inch Table Saw
TP305 12-1/2" Portable Planer
34-080 Type 1 10" Miter Saw
34-080 Type 2 10" Miter Saw
34-080 Type 2 10" Miter Saw
36-600 Type 1 Table Saw
36-600 Type 1 Table Saw
36-600 Type 2 Table Saw
36-600 Type 2 Table Saw
36-610 Type 2 Table Saw
36-610 Type 2 Table Saw
36-610 Type 1 Table Saw
36-610 Type 1 Table Saw
TP400LS Type 1 12-1/2" Planer
TP300 Type 1 Planer
This item works with the following types of products:
- • Chop Saw
- • Miter Saw
- • Planer
- • Saw
- • Table Saw
Questions & Answers for Carbon Brush
2) Remove plate
3) Remove blade
4) Unscrew the upper brush cap (you may need to lower the motor slightly if you have larger hands)
5) Remove old brush
6) Use compressed air to clean brush contact area
7) Insert new brush
8) Screw on brush cap while compressing brush spring with other hand (the most difficult part of the process)
9) From under the saw, do the same procedure (4-8) on the lower brush
Note: You do not have to invert the saw and remove the base, like some videos show (although this might make it easier for people who cannot lie on their backs).
The old brushes were about half the length of the new ones. The failure appears to be from the lack of spring pressure when they are shorter, not the lack of brush material. Also the buildup of sawdust on the armature can reduce the contact area. If you need to use the saw while waiting for new brushes, you may be able to get more life from the old ones by just removing them and cleaning the contact area with compressed air.
replace cap snug.
Installed the new brushes and brush caps, installed motor
2. Disassembled the motor
3. Installed new parts
4. Reassembled and reinstalled the motor
5. Repair complete
- 1
- 2
- 3
- 1
- 2
- 3