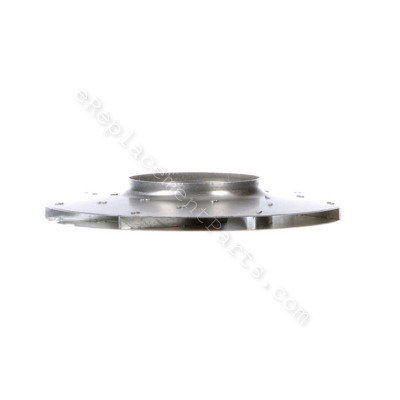
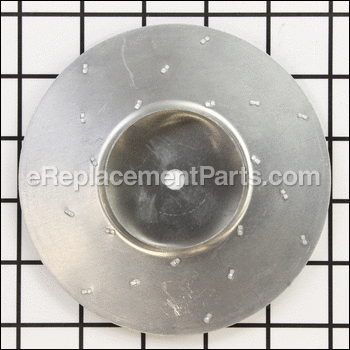
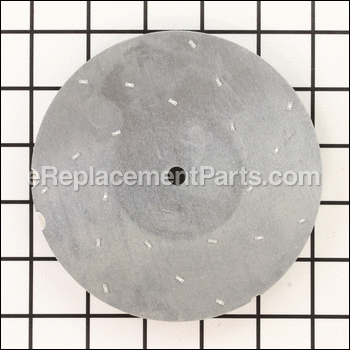


This is a genuine Ridgid replacement part for use in vacuums. The blower wheel goes between the collector and the lid. You may need a screwdriver when replacing this part. It will require replacing if it breaks. This item is made of a durable material and is sold individually.
Blower Wheel 96537
OEM part for: Ridgid, Craftsman
Part Number: 96537
$22.26
In Stock
Compatibility
This part will fit the following 20 machines
Ridgid
WD1635 Wet/Dry Vacuum View Diagrams & Manuals
WD1635M Wet/Dry Vacuum View Diagrams & Manuals
WD1245M Wet/Dry Vacuum View Diagrams & Manuals
WD12500 12 Gallon Wet/Dry Vac View Diagrams & Manuals
WD12460 12 Gallon Wet/Dry Vac View Diagrams & Manuals
Craftsman
113177415 Wet / Dry Vac View Diagrams & Manuals
113177000 Wet-Dry Vac View Diagrams & Manuals
113177650 Wet/Dry Vac View Diagrams & Manuals
113177611 Wet/Dry Vacuum View Diagrams & Manuals
113177905 Wet/Dry Vac View Diagrams & Manuals
113177101 16 Gallon Wet/Dry Vac View Diagrams & Manuals
113170340 Wet/Dry Vac View Diagrams & Manuals
113177490 Wet/Dry Vac View Diagrams & Manuals
113177620 Wet/Dry Vac View Diagrams & Manuals
113177405 32 Gallon Wet/Dry Vac View Diagrams & Manuals
11317313 Wet / Dry Vacuum View Diagrams & Manuals
113177311 Wet/Dry Vac View Diagrams & Manuals
113177341 Wet/Dry Vac View Diagrams & Manuals
113177141 Wet/Dry Vac View Diagrams & Manuals
113177630 Wet/Dry Vac View Diagrams & Manuals
Show More Compatible Models
This item works with the following types of products:
- Vacuum Parts
This part replaces obsolete part #: 818413-2
Customer Part Reviews ?
Average Rating (out of 5):
Click to filter by ratings:
5 stars
5
4 stars
0
3 stars
0
2 stars
0
1 stars
0
< PREV
- 1
Shop vac blower
It was a perfect match. Arrived quickly.saved me hundreds
Guest -
June 15, 2022
Verified Purchase
Shop Vac blower wheel - updated part
Updated Part, makes the big shop vac work like new.
Richard -
June 27, 2020
Verified Purchase
Worked well
Arrived quickly, Worked perfectly
Guest -
October 26, 2019
Verified Purchase
fit and worked great
fit and worked great, saves my old shop vac!
michael -
July 16, 2019
Verified Purchase
Replacement of Blower Wheel 96537 / 818413
I ordered Blower Wheel Part Number 96537 to replace blower wheel 818413 on a Craftsman 113.177060 vacuum/blower. The 96537 was a bolt-in replacement and is working great. The instruction sheet included with the new 96537 referenced replacing Part Number 818413 in the illustrations. Please note that the 96537 is same outer diameter and same shaft diameter as 818413, but about 2/3 the height of the 818413.
Ramon -
June 8, 2019
Verified Purchase
t
t
t -
t days ago
Verified Purchase
eReplacementParts Team
t
Questions & Answers ?
Our customer Service team is at the ready daily to answer your part and product questions.

Ask our Team
We have a dedicated staff with decades of collective experience in helping customers just like you purchase parts to repair their products.
Does this fit my product?Questions & Answers for Blower Wheel
No questions have been asked yet
Customer Repair Instructions ?
All our customer repair instructions are solicited directly from other customers just like you who have purchased and replaced this exact part.
Blower Wheel wore out/broke
Holly - June 16, 2022
Tool Type
Vacuum
Difficulty
Medium
Time
1-2 hours
Tools Used
Screwdriver, Power Drill, Socket set, Nutdriver, Impact wrench/driver
Parts Used
Disassembled Blower and cleaned all parts.
Removed hex nut (took an impact driver to get it off)
Removed old blower wheel and washer (center hole on bottom was completely cut away the size of the retaining washer which allowed the wheel to wobble and scrape causing noise
Replaced with new blower wheel and (cleaned) old washer
Reassembled Blower
My Craftsman 6.5hp/16 gal wet/dry vac with detachable blower has been used tons for multiple jobs out, in and around the house for years! Wouldn't be without it voluntarily. It started making noise when using the blower detached and progressively got worse. At first only if it was moved quickly or not upright, then most of the time even when it was mounted on the canister. I now know why after seeing the worn out wheel.
As a 60ish female, I'm fairly handy and I always prefer to repair rather than replace when possible, saves $$$ and solid waste. The most difficult part was removing the hex nut. You have to hold the motor from turning and there is only a screw on the opposite end (poor engineering if you ask me). I tried everything, even had my daughter lend her two hands. No luck. My son-in-law had it off in seconds with an impact wrench/driver.
After repaired with the new blower wheel it works well. The replacement wheel (RAPID brand) is the same diameter and the bottom hole is the same size, so it fits. But it is thinner or narrower than the original (CRAFTSMAN) wheel (discontinued). I think it has somewhat less blowing/sucking power due to the narrower wheel, but is so far (I have only used it a time or two since repair) still sufficient to do what I need it to do.
Did you find this story helpful?
Thanks for voting and helping fellow customers!
Vac/Blower made slight abrasive sound/loss of power
Richard - July 3, 2020
Tool Type
Vacuum
Difficulty
Easy
Time
30-60 minutes
Tools Used
Screwdriver, Socket set
Parts Used
Remove plastic covers from vac/blower motor unit. Use a nutdriver or wrench and large blade screwdiver to remove the blower wheel. You can see the bend / slightly depressed metal alloy below the washer / nut. You would think something so slight would not have much of an affect but it does. I initially used a large washer in this area and performance improved for a couple months, but then the same problem. I ordered the new blower wheel, now it is like new, strong, quiet. Should have ordered it sooner, I had to trim off some plastic debris caused by the bad wheel. Also research indicated this was a design issue and the new improved wheel is slightly smaller in size but works like new.
Did you find this story helpful?
Thanks for voting and helping fellow customers!
Shop Vac Blower Wheel came off, center wore out
Natalie - December 17, 2019
Tool Type
Vacuum
Difficulty
Hard
Time
More than 2 hours
Tools Used
Screwdriver, Pliers, Socket set, Wrench Set, *VISE GRIP PLIERS*
Parts Used
1. Took blower apart, as for regular cleaning, saw blower wheel was loose. Ordered new part.
2. UNABLE to get bolt off to replace wheel! Spindle has flat head screw on other end. Screwdriver just popped off. Used Liquid Wrench to loosen threads, did not work.
3. Finally succeeded by using a large *VISE GRIP PLIERS* clamped on the broken wheel center and spacers under the bolt (much better grip and torque or leverage than the screw on the other side of the spindle), and a 7/16" socket ratchet drive wrench on the bolt - positioned inside the vise grip pliers. Twisted them in opposite directions and bolt came off!
4. Flipped the broken inside center of the aluminum wheel off with a utility knife, put on the new wheel with the spacer/washer back on top, and reattached the bolt. Did not tighten too much, wheel is soft aluminum. (could last another 25 years...)
5. Reassembled blower and it works great! New part is slightly narrower, but power same or better (air more compressed in smaller vents?) Sears Craftsman 16 gallon shop vac with Ridgid replacement blower wheel. Blower is 25 years old and going strong. Use detachable blower all the time.
6. Saved alot of plastic from landfill.
Did you find this story helpful?
Thanks for voting and helping fellow customers!
Original blower wheel corroded at the washer and came loose
David - July 4, 2018
Tool Type
Vacuum
Difficulty
Easy
Time
15-30 minutes
Tools Used
Screwdriver
Parts Used
1) Removed 3 Phillips screws from the filter grill.
2) Removed filter grill and cleaned filter.
3) Removed all external Phillips screws from the blower housing around the outside and handle.
4) Separated the blower housing halves, minding the wires.
5) Removed the internal Phillips screws holding the motor and duct to the housing.
6) Gently and firmly pulled the motor and duct out of the housing and keeping the sticky seal intact.
7) Removed the blower wheel (held by nut with washer).
8) Replaced the blower wheel and reassembled in reverse order, making sure gasket seal was in correct position and wires weren't pinched.
9) Plugged in and tested.
Did you find this story helpful?
Thanks for voting and helping fellow customers!
vacuum's failed
david - September 19, 2016
Tool Type
Vacuum
Difficulty
Medium
Time
30-60 minutes
Tools Used
Power Drill, Socket set, allen wrenches
Parts Used
1. Remove guard from blower wheel
2. Remove old wheel
3. Install new wheel
4. Reassemble guard
Had a tough time finding replacement parts for the units 8 in total broke down.
found what I needed on your site ! thanks !!
2. Remove old wheel
3. Install new wheel
4. Reassemble guard
Had a tough time finding replacement parts for the units 8 in total broke down.
found what I needed on your site ! thanks !!
Did you find this story helpful?
Thanks for voting and helping fellow customers!
OEM stands for Original Equipment Manufacturer and means the part you’re buying is sourced directly from the manufacturer who made your product. At eReplacementParts, we sell only genuine OEM parts, guaranteeing the part you’re purchasing is of better design and of higher quality than aftermarket parts.
Our product descriptions are a combination of data sourced directly from the manufacturers who made your product as well as content researched and curated by our content & customer service teams. This content is edited and reviewed internally before being made public to customers.
Our customer service team are at the ready daily to answer your part and product questions. We have a dedicated staff with decades of collective experience in helping customers just like you purchase parts to repair their products.
All our part reviews are solicited directly from other customers who have purchased this exact part. While we moderate these reviews for profanity, offensive language or personally identifiable information, these reviews are posted exactly as submitted and no alterations are made by our team.
All our customer repair instructions are solicited directly from other customers just like you who have purchased and replaced this exact part. While we moderate these reviews for profanity, offensive language or personally identifiable information, these reviews are posted exactly as submitted and no alterations are made by our team.
Based on data from past customer purchasing behaviors, these parts are most commonly purchased together along with the part you are viewing. These parts may be necessary or helpful to replace to complete your current repair.
All our installation videos are created and produced in collaboration with our in-house repair technician, Mark Sodja, who has helped millions of eReplacementParts customers over the last 13 years repair their products. Mark has years of experience in selling and repairing both commercial and residential products with a specialty in gas-powered equipment.
This data is collected from customers who submitted a repair instruction after replacing this exact part. Customers can rate how easy the repair was to complete and how long it took. We aggregate this data to provide a repair rating that allows customers to quickly determine the difficulty and time needed to perform their own repair.