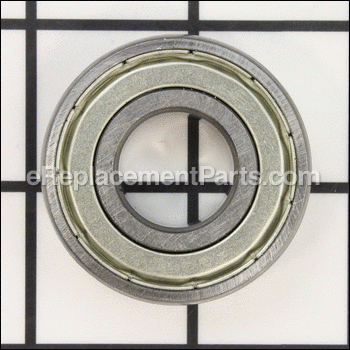
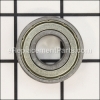
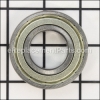
Ball Bearing BB-6203ZZ
Part Number: BB-6203ZZ
Order within the next 5 hours
and your part ships today!
and your part ships today!
*This part replaces obsolete part #: 5300531.
Product Information
Description:
| Genuine Manufacturer Sourced replacement part used on a variety of Power Tools. This part is made out of Metal and it is sold individually. Ball bearings are used to reduce friction between rotating parts. The balls or rollers take the load and spin, distributing the weight evenly while the minimal contact area of the ball reduces friction. This reduces wear on the tool and allows it to run smoothly. Bearings experience constant wear when the tool is in operation from pressure, heat, vibration and friction. Because of this, many Bearings need periodic maintenance or replacement. |
Frequently Purchased With


Compatibility
the 64 compatible machines
This part is compatible with the following machines:
Powermatic
54A (1791279DXK) 6 in. Quick-Set Knives Jointer
201 (1791261) 7.5 HP-1Ph 230V Helical Cutterhead Planer
201 (1791262) 7.5 HP-3Ph 230V Helical Cutterhead Planer
201 (1791280) 7.5 HP-3Ph 460V Helical Cutterhead Planer
201HH (1791269) 7.5 HP-3Ph 460V Helical Cutterhead Planer
WP2510 (1791303) 15HP-3Ph 230 / 460V 25" Planer
201HH (1791267) 7.5 HP-1Ph 230V Helical Cutterhead Planer
201HH (1791268) 7.5 HP-3Ph 230V Helical Cutterhead Planer
PM2800 (1792800) TEFC 1HP 115/230V Drill Press
PM2800 (1792800) TEFC 1HP 115/230V Drill Press
64A (1791227K) 10 in. w/30 in. Rails- 27 x 17 Extension Table Contractors Table Saw
64A (1791227K) 10 in. w/30 in. Rails- 27 x 17 Extension Table Contractors Table Saw
64A (1791228K) 10 in. w/50 in. Rails- 27 x 36 Extension Table and Legs Contractors Table Saw
64A (1791228K) 10 in. w/50 in. Rails- 27 x 36 Extension Table and Legs Contractors Table Saw
64A (1791228K) 10 in. w/50 in. Rails- 27 x 36 Extension Table and Legs Contractors Table Saw
64A (1791270K) 10 in. w/30 in. Rails- 27 x 17 Extension Table- Legs- Route-R-Lift Contractors Table Saw
64A (1791270K) 10 in. w/30 in. Rails- 27 x 17 Extension Table- Legs- Route-R-Lift Contractors Table Saw
64A (1791270K) 10 in. w/30 in. Rails- 27 x 17 Extension Table- Legs- Route-R-Lift Contractors Table Saw
64A (1791271K) 10 in. w/50 in. Rails- 27 x 36 Extension Table- Legs- Route-R-Lift Contractors Table Saw
64A (1791271K) 10 in. w/50 in. Rails- 27 x 36 Extension Table- Legs- Route-R-Lift Contractors Table Saw
64A (1791271K) 10 in. w/50 in. Rails- 27 x 36 Extension Table- Legs- Route-R-Lift Contractors Table Saw
DDS-225 25" Dual Drum Sander
DDS-237 37" Dual Drum Sander
2800 18-inch Variable Speed Drill Press
2800 18-inch Variable Speed Drill Press
PM1000 (1791000K) 10-inch Cabinet Saw
PM1000 (1791001K) 10-inch Cabinet Saw
64A (1791270K) 10 in. w/30 in. Rails- 27 x 17 Extension Table- Legs- Route-R-Lift Contractors Table Saw
64A (1791270K) 10 in. w/30 in. Rails- 27 x 17 Extension Table- Legs- Route-R-Lift Contractors Table Saw
64A (1791270K) 10 in. w/30 in. Rails- 27 x 17 Extension Table- Legs- Route-R-Lift Contractors Table Saw
64A (1791271K) 10 in. w/50 in. Rails- 27 x 36 Extension Table- Legs- Route-R-Lift Contractors Table Saw
64A (1791271K) 10 in. w/50 in. Rails- 27 x 36 Extension Table- Legs- Route-R-Lift Contractors Table Saw
64A (1791271K) 10 in. w/50 in. Rails- 27 x 36 Extension Table- Legs- Route-R-Lift Contractors Table Saw
DDS-225 25" Dual Drum Sander
DDS-237 37" Dual Drum Sander
2800 18-inch Variable Speed Drill Press
2800 18-inch Variable Speed Drill Press
PM1000 (1791000K) 10-inch Cabinet Saw
PM1000 (1791001K) 10-inch Cabinet Saw
Jet
JDP-17FSE (354171) Drill Press
JDP-17FSE (354171) Drill Press
JJ-6CSX (708457K) Woodworking Jointer
JJ-6CSDX (708457DXK) Woodworking Jointer
XACTA (708674) Deluxe Saw
JPM-13 (708526) Planer / Molder
JPM-13CS (708524) Planer / Molder
JTM-4VS Turret Mill
JWBS-18X (710750) 18" Bandsaw
JWBS-18X (710750) 18" Bandsaw
JDP-12 (707300) 12" Variable Speed Drill Press
JDP-12 (707300) 12" Variable Speed Drill Press
JTAS-10 Tilting Arbor Tablesaw
JTAS-10 Tilting Arbor Tablesaw
JTAS-10XL Left Tilting Arbor Saw
SLT-660F (140777) Scissor Lift Table
SLT-1650 (140779) Scissor Lift Table
SLT-1100 Jumbo Scissor Lift Table
JJ-6CS (708456) Woodworking Jointer
JWP-12 Planer
JWP12-4P Planer
JWBS-18 708750 Woodworking Bandsaw
JWBS-18 708750 Woodworking Bandsaw
JSL-6J Open Stand Jointer
VBS-18MW 18-Inch Metal/Wood Cutting Band Saw
VBS-18MW 18-Inch Metal/Wood Cutting Band Saw
JWP-12DX Deluxe Wood Planer
140779-SLT-1650 140779slt-1650 Scissor Lift Table Parts
690912-JTM-1050EVS 690912jtm-1050evs Turret Mill Parts
690914-JTM-1050EVS 690914jtm-1050evs Turret Mill Parts
577004-J-41002 577004j-41002 Belt-Disc Sander Parts
1-2-PT-(252005) 1/2-Ton Heavy Duty Manual Trolley
140777 Folding Handle, Quick-Lift Pump Scissor Lift Table, 660-Lb. Capacity
140779 Quick-Lift Pump Scissor Lift Table, 1,650-Lb. Capacity
140780 Jumbo Scissor Lift Table, Quick-Lift Pump, 1,100-Lb. Capacity
1-PT-(252010) 1-Ton Heavy Duty Manual Trolley
JPM-13CS-PLANER-MOLDER-708524 Jpm-13cs Planer-Molder Parts 708524
Products Compatibility
List
This item works with the following types of products:
- • Band Saw
- • Drill
- • Drill Press
- • Jig saw
- • Jointer
- • Planer
- • Sander
- • Saw
- • Table Saw
Questions & Answers for Ball Bearing
No questions have been asked yet
Repair Instructions: Submitted by Customers Like You
6 of 6 people found this instruction helpful
Tool Type:
Table Saw
Parts Used:
Repair Difficulty:
Medium
Time Spent Repairing:
More than 2 hours
Tools Used:
Wrench Set, Nutdriver, Rubber mallet, scrap wood, arbor press, freezer
Bearings were worn out and noisy
This was about a 2-3 hour process. Could have been less if I had jigs to removing and setting the bearings already, but I had to cobble together a setup using scrap wood and metal.
1. Unplugged the tool!
2. Removed the blade
3. Loosened the belt tension. Loosened two bolts that secured motor on pivot and lifted up. Removed belts one at a time (there are 3)
4. Removed spanner nut and arbor nut on the back of the shaft. When doing the arbor nut you need a wrench for the blade-side and a socket for the other side. Remember, the nut is reverse-threaded! Righty-loosey, lefty-tighty in this case.
5. After those are loose, tapped the non-blade side of the shaft with a rubber mallet to extract it.
6. There was one bearing still on the shaft, and one bearing in the assembly. The one of the shaft had to be removed with an arbor press and creativity (it is difficult to get up under the flange, need to use a wrench or couple pieces of steel and bang on those). The bearing that was still in the assembly just comes out, but you may need to tap it from the other side if it's stuck.
7. Once bearings are removed (which is the longest part of the process), put the new one on the shaft. When installing the new ones, make sure to only put force against the outer ring/race of the bearing where it is strongest. If you hit the cage/shield, you will mess up the bearings as it is soft metal there. Just be patient and clever.
8. Now the tricky part, reassembling the shaft assembly. Look at the diagram for which parts to put on first.
9. Once all the shaft parts are in place, tighten down the spanner nut to lock the loose bearing in place.
10. CRITICAL: Put arbor nut on, but DO NOT wrench down on it. Just get it to meet up with the end of the thread. Putting any amount of torque on it after it has met a surface will compress the bearings in a direction they are not meant to handle force, shortening the lifespan of the bearings. This is the second time I've reinstalled the bearings in 6 months and talking to an expert convinced me that is the issue we've been having.
The bearings that are installed now are already sounding gritty again, whereas when they were freshly installed they were quiet as a mouse. Take care in reinstalling because it will determine how long your bearings last.
Did you find this story helpful?
Thanks for voting and helping fellow customers!
1 of 1 people found this instruction helpful
Tool Type:
Table Saw
Repair Difficulty:
Medium
Time Spent Repairing:
More than 2 hours
Tools Used:
Screwdriver, Socket set, Wrench Set, Hex Head Wrenches
Saw made squealing sound, vibration, and slight wobble in blade initially.
1. Removed rails and extension table.
2. Removed saw table top (as 1 piece). Make note of any shims under the table top when lifting it off.
3. Removed belts by loosening saw motor.
4. Removed arbor assembly as a unit.
5. Replaced both bearings, spacers, and load spring. The arbor shaft has a left hand threaded nut on the end that required cutting off as it was so tight. I would recommend ordering a new nut.
6. Reinstalled arbor assembly. (Turn tilt adjustment wheel to aid in getting assemble aligned properly. Lubricate all parts to ease installation and don't try to force any of the mating parts.
7. Reinstall all other parts in reverse order (3-1)
Did you find this story helpful?
Thanks for voting and helping fellow customers!
Tool Type:
Table Saw
Parts Used:
Repair Difficulty:
Medium
Time Spent Repairing:
1-2 hours
Tools Used:
Screwdriver, Socket set, Wrench Set
Bearing went bad
Remove cast-iron top, all belts pulleys and anything else in the way. Carefully tap out threaded washer to get to bearing. Then reassemble the same way you took it apart
Did you find this story helpful?
Thanks for voting and helping fellow customers!
Tool Type:
Band Saw
Parts Used:
Repair Difficulty:
Easy
Time Spent Repairing:
Less than 15 minutes
Tools Used:
Socket set, Hammer
Bearing collapsed.
Released the blade tension, pulled the bandsaw top wheel off, knocked out the old bearing, and inserted the new.
Did you find this story helpful?
Thanks for voting and helping fellow customers!
Tool Type:
Table Saw
Parts Used:
Repair Difficulty:
Easy
Time Spent Repairing:
1-2 hours
Tools Used:
Screwdriver, Socket set, Wrench Set, Adjustable Wrench
Ball bearing was wore out within a year
I try to figure out why ball bearing was wore out within a year after 15 years. So, I did put some lubes around two ball bearing. I might hope these bearings keep longer running.
Did you find this story helpful?
Thanks for voting and helping fellow customers!
Tool Type:
Table Saw
Parts Used:
Repair Difficulty:
Hard
Time Spent Repairing:
1-2 hours
Tools Used:
Socket set, Wrench Set
table-saw arbor ball bearing
1. Loosen the motor belt tension
2. unscrew the left loosening nut
3. push the shaft out
4. take the ball bearing out with bearing puller
5. mount the new bearing on
6. add the new side bearing on too
7. screw the nut on tighten by counterclockwise tightening.
Wasted one hour trying to take the ball bearing out by simply using two metal plates and a piece of wood an hammering it. Borrowed my brother's ball bearing puller and took only 25 minutes to assemble after that.
Did you find this story helpful?
Thanks for voting and helping fellow customers!
Tool Type:
Jointer
Parts Used:
Repair Difficulty:
Easy
Time Spent Repairing:
30-60 minutes
Tools Used:
Socket set, Wrench Set
Jointer bearing failure
Removed jointer knife head assembly.
Pressed old bearings from assembly carefully marking right and left bearing mounts before removal.
Pressed new bearings into assembly.
Mounted assembly back into jointer base.
Checked alinement and bold torques.
Made final jointer table alinement adjustments and started jointer.
Pressed old bearings from assembly carefully marking right and left bearing mounts before removal.
Pressed new bearings into assembly.
Mounted assembly back into jointer base.
Checked alinement and bold torques.
Made final jointer table alinement adjustments and started jointer.
Did you find this story helpful?
Thanks for voting and helping fellow customers!
Tool Type:
Table Saw
Parts Used:
Repair Difficulty:
Medium
Time Spent Repairing:
More than 2 hours
Tools Used:
Screwdriver, Pliers, Socket set, Wrench Set, Adjustable Wrench, Arbor press
Ball bearing on arbor shaft of my Jet table saw went bad
Time consuming part of the job was taking apart the saw with extensions on both sides and front, then lifting off the actual top. Fairly straight forward getting the belts off then removing the shaft after that. Took pics to remember how the spacers and washers went, replaced the bearings and proceeded to reassemble. Works great.
Did you find this story helpful?
Thanks for voting and helping fellow customers!
Tool Type:
Band Saw
Parts Used:
Repair Difficulty:
Easy
Time Spent Repairing:
15-30 minutes
Tools Used:
, Mallet, wood rod to knock out bearings
Worn bearings on upper wheel, caused blade to wobble front to back. Vibration
1. Remove blade
2. Remove wheel
3. Lay on a bench with the open area under center area
4. Using wooden rod, place rod through center of bearing to reach bearing on other side.
5. Tap bearing out evenly around all sides. Use a little harder tap to get started.
6. Flip over wheel and repeat for other bearing. Easy once first bearing is out of way.
7. Clean inside surface of wheel prior to inserting new bearings
8. Find small flat piece of wood, 2x4 0r 1x4 then place new bearing over hole. Place wood on top of bearing then tap evenly to get started. Get eye level with wheel and slowly tap in place.
9. Install wheel
10. Install blade
11. Done!!
Did you find this story helpful?
Thanks for voting and helping fellow customers!
Tool Type:
Jointer
Repair Difficulty:
Easy
Time Spent Repairing:
1-2 hours
Tools Used:
Screwdriver, Socket set, Wrench Set, Hammer, bearing puller
Excessive noise
Remove the cutterhead from the jointer. Remove the pulley from the cutterhead by loosening the set screws and pulling on the pulley and removing the shaft key. Use a bearing puller to remove the old bearings. Then use a socket the same size as the inner race of the new bearing to tap the socket with the hammer, to seat the bearing on the cutterhead. Then install the pulley and the cutterhead back on the jointer.
Did you find this story helpful?
Thanks for voting and helping fellow customers!
Reviews
9 Reviews
Average Rating (out of 5):
Click to filter by ratings:
5 stars
8
4 stars
0
3 stars
0
2 stars
1
1 stars
0
< PREV
- 1
The exact part
Thanks for the quick service and ease of finding the part I needed. This is the second time I've ordered from ereplacement parts. So glad I found this site.
Guest -
March 8, 2022
Verified Purchase
Worked as expected and fit perfectly
My table saw is working like new again. Thanks
Juan -
August 17, 2021
Verified Purchase
worked!
The schematics of the table saw helped to determine the defective part.
Very helpful.
Guest -
August 7, 2021
Verified Purchase
Easy to replace the bearing
It is very smooth to fix my tables which is 20 years old. I did change the bearings twice. My tablesaw is my priority.
Guest -
January 14, 2021
Verified Purchase
great part
exact fit great customer service fast shipping I will be doing more business in the future
Guest -
July 15, 2020
Verified Purchase
👍
👍
David -
December 7, 2019
Verified Purchase
Table saw parts
Great service
Guest -
November 12, 2019
Verified Purchase
Easy Fix
Came quickly and was exact match
Guest -
November 12, 2019
Verified Purchase
Notsohappy
The bearings l purchased were fine...however, on 12/16/19 l ordered some additional pieces, and added expedited shipping...still have not seen anything after a week and a half...consequently l have not been able to complete the projects, costing me time and money...please tell me your next step
Guest -
December 26, 2019
Verified Purchase
Verified Purchase
eReplacementParts Team
< PREV
- 1
Product Information