
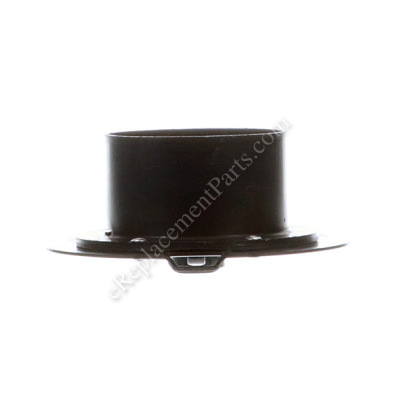


This is a manufacturer approved replacement part designed for use with high wheeled trimmers. This carrier plate acts as a trimmer head/housing which secures the trimmer line. It is made out of metal and it is sold individually. Please note the locking plate/tab is sold separately. To complete this repair you would need a socket wrench to remove the bolt which holds the assembly to the jackshaft.
Carrier Plate 594935003
OEM part for: Husqvarna, Ryobi, Craftsman, Poulan, Weed Eater, Jonsered
Part Number: 594935003
$75.96
In Stock
Jump To:
Frequently Purchased Together ?


Compatibility
This part will fit the following 62 machines
Poulan
PPWT60022 (431477) High Wheeled Trimmer View Diagrams & Manuals
PPWT60022 (412266) High Wheeled Trimmer View Diagrams & Manuals
PPWT60022X (412267) High Wheeled Trimmer View Diagrams & Manuals
PPWT60022X (431476) High Wheeled Trimmer View Diagrams & Manuals
PPWT62522 High Wheeled Trimmer View Diagrams & Manuals
PPWT62522 (96172000401) Wheeled Weedtrimmer View Diagrams & Manuals
Weed Eater
WT420 Wheeled Weedtrimmer View Diagrams & Manuals
PWT420A Wheeled Weedtrimmer View Diagrams & Manuals
Craftsman
917773708 Weed Trimmer View Diagrams & Manuals
917773710 Wheeled Weed Trimmer View Diagrams & Manuals
917.773706 High Wheel Weed Trimmer View Diagrams & Manuals
917773741 Trimmer View Diagrams & Manuals
917773420 Trimmer View Diagrams & Manuals
917773421 Trimmer View Diagrams & Manuals
917773422 Trimmer View Diagrams & Manuals
917773423 Trimmer View Diagrams & Manuals
917773700 Trimmer View Diagrams & Manuals
917773701 Trimmer View Diagrams & Manuals
917773702 Trimmer View Diagrams & Manuals
917773703 Trimmer View Diagrams & Manuals
917773704 Trimmer View Diagrams & Manuals
917773705 Trimmer View Diagrams & Manuals
917773706 Trimmer View Diagrams & Manuals
917773707 Trimmer View Diagrams & Manuals
917773711 Trimmer View Diagrams & Manuals
917773720 Trimmer View Diagrams & Manuals
917773730 Trimmer View Diagrams & Manuals
917773740 Trimmer View Diagrams & Manuals
917773742 Trimmer View Diagrams & Manuals
917773743 Trimmer View Diagrams & Manuals
917773744 Trimmer View Diagrams & Manuals
917773745 Trimmer View Diagrams & Manuals
917773746 Trimmer View Diagrams & Manuals
917773750 Trimmer View Diagrams & Manuals
917773751 Trimmer View Diagrams & Manuals
917773752 Trimmer View Diagrams & Manuals
917773753 Trimmer View Diagrams & Manuals
917773754 Trimmer View Diagrams & Manuals
917773760 Trimmer View Diagrams & Manuals
917773761 Trimmer View Diagrams & Manuals
917773762 Trimmer View Diagrams & Manuals
917773763 Trimmer View Diagrams & Manuals
917773764 Trimmer View Diagrams & Manuals
Husqvarna
HU625HWT (2011-10)(96173000202) Trimmer View Diagrams & Manuals
HU625HWT (2012-01)(96173000203) Trimmer View Diagrams & Manuals
HU625HWT (2011-11)(96173000300) Trimmer View Diagrams & Manuals
HU625HWT (2012-01)(96173000301) Trimmer View Diagrams & Manuals
HU625HWT (2012-10)(96173000302) Trimmer View Diagrams & Manuals
HU625HWT (2013-03)(96173000400) Trimmer View Diagrams & Manuals
HU625HWT (2013-10)(96173000500) Wheeled Weed Trimmer View Diagrams & Manuals
PPWT60022 (96172000600) (2009-11) Handheld Trimmer View Diagrams & Manuals
PPWT60022X (96172000700) (2010-04) Lawn Mower: Consumer Walk Behind View Diagrams & Manuals
HU625WT (96173000101) (2010-11) Trimmer View Diagrams & Manuals
HU625WT (96173000100) (2009-11) Trimmer View Diagrams & Manuals
HU625WTX (96173000201) (2011-09) Trimmer View Diagrams & Manuals
HU625WTX (96173000200) (2010-12) Trimmer View Diagrams & Manuals
HU675HWT (96175000202) (2017-01) Trimmer View Diagrams & Manuals
HU675HWT (96175000201) (2016-08) Trimmer View Diagrams & Manuals
HU675HWT (96175000200) (2015-12) Trimmer View Diagrams & Manuals
HU675HWT (96173000601) (2017-01) Trimmer View Diagrams & Manuals
HU675HWT (96173000600) (2015-10) Trimmer View Diagrams & Manuals
Jonsered
J625HWT - 96172001400 (2014-02) Zero Turn: Consumer View Diagrams & Manuals
Show More Compatible Models
This item works with the following types of products:
- Trimmer Parts
This part replaces obsolete part #: 5321803-38, 532180338, 180338
Customer Part Reviews ?
Average Rating (out of 5):
Click to filter by ratings:
5 stars
12
4 stars
0
3 stars
0
2 stars
0
1 stars
0
< PREV
- 1
- 2
Exact replacement
The part is an identical match to the original. I installed it in just a few minutes and it fits perfectly.
Guest -
September 26, 2023
Verified Purchase
Perfect
The needed part arrived quickly. Installation was easy. Works great. I recommend.
Guest -
March 14, 2023
Verified Purchase
Easy repair and worked as expected
Fit perfectly
Charlie -
September 18, 2021
Verified Purchase
Tall grass mower
The right part delivery was fast and the right part. Thanks
Guest -
October 7, 2020
Verified Purchase
easy repair when you have the right parts
Excellent!! Fit perfectly.
Guest -
September 10, 2020
Verified Purchase
Easy to replace
Back in action.
Guest -
June 20, 2020
Verified Purchase
easy shipping and order
part in good shape
Guest -
April 14, 2020
Verified Purchase
Trimmer head
Was fast and easy. Fit like a glove
Guest -
October 3, 2019
Verified Purchase
worked as expected
was the part that I needed shipping could of been faster over all vary satisfied
Guest -
August 17, 2019
Verified Purchase
Fast, friendly and perfect part!
Arrived on time and in good shape. Seems to function as expected. It will get a full test tomorrow and if I don’t come back and change this assume it works as advertised!
Guest -
July 14, 2019
Verified Purchase
t
t
t -
t days ago
Verified Purchase
eReplacementParts Team
t
Questions & Answers ?
Our customer Service team is at the ready daily to answer your part and product questions.

Ask our Team
We have a dedicated staff with decades of collective experience in helping customers just like you purchase parts to repair their products.
Does this fit my product?Questions & Answers for Carrier Plate
What is the bolt sizeholding the mow ball and is counter clockwise threaded?
Jack
for model number 917.773762
asked on 2023-05-21
Hello Jack, Thank you for your inquiry. We show the bolt as part# 532180334 and a right hand thread, and it shows as an 1 1/3 inches in diameter at the head and an inch and 1/8 long. We hope this helps.
eReplacementParts Team May 21, 2023
Thick wire behind the carrier plate Should carrier plate just side off?
Sindy
for model number HU675HWT
asked on 2022-08-03
Hi Sindy,
Thank you for your question. To remove the carrier plate, you will need to use an Allen wrench set and a screw driver to replace this part. If you have any questions, please let us know. We are open 7 days a week. We look forward to hearing from you!
eReplacementParts Team August 03, 2022
would this carrier plate assembly fit my trimmer
Betty
for model number 961730006
asked on 2022-06-29
Hi Betty,
Thank you for your question. Yes, this would be the correct carrier plate assembly for your trimmer. If you need help placing an order for it, customer service is open 7 days a week and anyone will be happy to assist you. Please feel free to give us a call. We look forward to hearing from you!
eReplacementParts Team June 29, 2022
Customer Repair Instructions ?
All our customer repair instructions are solicited directly from other customers just like you who have purchased and replaced this exact part.
Trimmer spindle broken after striking "one too many rocks"
Edward - July 26, 2016
👍 9 of 9 people found this instruction helpful
Tool Type
Trimmer
Difficulty
Medium
Time
15-30 minutes
Tools Used
Socket set
1. Unscrewed lower bumper
2. Slid off the lower bumper
3. Released and pulled off trimer line holder
4. Cleaned shaft
5. Installed spring and plate into holder
6. Slid on new holder
7. Screwed on lower bumper
Done!
Nothing went wrong
2. Slid off the lower bumper
3. Released and pulled off trimer line holder
4. Cleaned shaft
5. Installed spring and plate into holder
6. Slid on new holder
7. Screwed on lower bumper
Done!
Nothing went wrong
Did you find this story helpful?
Thanks for voting and helping fellow customers!
The carrier plate broke apart.
Mike - August 11, 2017
👍 7 of 7 people found this instruction helpful
Tool Type
Trimmer
Difficulty
Easy
Time
Less than 15 minutes
Tools Used
Socket set, Emory cloth and lubricant spray
The carrier plate broke and came apart. It was all made of plastic and the parts I ordered from eReplacementParts made it easy to repair it back to new again. I really think the parts that came to replace the broken pieces are made from better material then the parts from the factory when built.
Did you find this story helpful?
Thanks for voting and helping fellow customers!
The metal finger on the trimmer head broke and the bolt was rounded off.
Edwin - June 14, 2016
👍 4 of 5 people found this instruction helpful
Tool Type
Trimmer
Difficulty
Medium
Time
15-30 minutes
Tools Used
Screwdriver, Wrench Set, Adjustable Wrench, Angle grinder
First I drenched the shaft with penetrating oil, then in order to get the stripped bolt off I took a metal cutting wheel and cut a groove in bolt head and used a screwdriver to turn the bolt. I then used an adjustable wrench to hold drive shaft to take out the bolt. I pulled off and removed the spring and metal lock mechanism. I installed the spring and lock mechanism in the new trimmer head. I put the head back on the shaft, then put on the new bolt.
Did you find this story helpful?
Thanks for voting and helping fellow customers!
Carrier had broken string holder
Roland - July 7, 2018
👍 2 of 2 people found this instruction helpful
Tool Type
Trimmer
Difficulty
Medium
Time
30-60 minutes
Tools Used
Screwdriver, Pliers, Socket set, Wrench Set, Penetrating Oil & fine Sandpaper
Parts Used
1. Removed mower ball
2. Carrier would not budge from jackshaft ; applied penetrating oil around shaft.
3. Pushed in lock lever & tapped carrier to highest level.
4. Used fine sandpaper on shaft that extended past carrier to remove rust & pits
5. Pushed in lock lever & applied downward pressure ; carrier slipped off
6. Replaced carrier w/ eReplacement part, replaced Mower ball, replaced string, started trimmer & finished the job.
7. Thanks :)
Did you find this story helpful?
Thanks for voting and helping fellow customers!
Carrier plate assembly had a broken line holder
Melvin - July 20, 2017
👍 2 of 2 people found this instruction helpful
Tool Type
Trimmer
Difficulty
Easy
Time
Less than 15 minutes
Tools Used
Screwdriver, Allen wrench set
Parts Used
Took out the old one.
Replaced it with the new one.
Placed my bearing and retainer clip on the new mow ball.
Adjusted carrier plate to proper height and replaced mow ball assembly.
Very easy to do, The parts ordered were just what I needed. They were here
in a timely manner. Very happy customer.
Replaced it with the new one.
Placed my bearing and retainer clip on the new mow ball.
Adjusted carrier plate to proper height and replaced mow ball assembly.
Very easy to do, The parts ordered were just what I needed. They were here
in a timely manner. Very happy customer.
Did you find this story helpful?
Thanks for voting and helping fellow customers!
Carrier plate broke in half.
Robyn - April 4, 2019
👍 1 of 1 people found this instruction helpful
Tool Type
Trimmer
Difficulty
Easy
Time
15-30 minutes
Tools Used
Socket set
Parts Used
Replaced withe new Carrier plate.
Did you find this story helpful?
Thanks for voting and helping fellow customers!
Carrier was worn out.
Matthew - May 6, 2022
Tool Type
Trimmer
Difficulty
Easy
Time
Less than 15 minutes
Tools Used
Wrench Set
Parts Used
Removed the carrier ball, then slide carrier down off of shaft, beveled on one side so it only fits one way
Did you find this story helpful?
Thanks for voting and helping fellow customers!
Trim cord plate assembly had broken lug that holds trim cord
Rick - August 30, 2021
Tool Type
Trimmer
Difficulty
Easy
Time
30-60 minutes
Tools Used
Screwdriver, Pliers, Socket set
Parts Used
The hardest part of replacing the trim cord plate assembly was cleaning dried grass and dirt to access screws.
After cleaning, remove the thin head bolt holding the foot on the bottom of the trimmer shaft. Clean around the shaft keeper that holds the trim cord plate assembly so you can slide the keeper away from the motor shaft while pulling the plate assembly off of the trimmer shaft.
You might have to file off burrs on the shaft so the trimmer cord plate assembly slides easily off the shaft. Install the new assembly by reversing the above steps.
Cleaning parts make it easy to reinstall and consider buying a new shaft keeper and springs that hold the trimmer cord plate assembly to the shaft.
I cleaned all the dirt and dried grass residue off and it made reassembly pretty easy.
Did you find this story helpful?
Thanks for voting and helping fellow customers!
Could not adjust cut height because of damaged carrier plate
Seshakrishnan - June 4, 2021
Tool Type
Trimmer
Difficulty
Easy
Time
Less than 15 minutes
Tools Used
Wrench Set
Parts Used
- removed old carrier plate assembly using wrench.
- removed spring and latch from old assembly.
- inserted the spring and latch into new head assembly and screwed in the nut that holds the assembly.
NOTE: Latch has to be inserted into head assembly through the slot on the flange in the assembly.
- removed spring and latch from old assembly.
- inserted the spring and latch into new head assembly and screwed in the nut that holds the assembly.
NOTE: Latch has to be inserted into head assembly through the slot on the flange in the assembly.
Did you find this story helpful?
Thanks for voting and helping fellow customers!
Tiller Hard to start, trimer had drive cable broke & carrier plate broken
Howard - July 3, 2020
Tool Type
Trimmer
Difficulty
Medium
Time
1-2 hours
Tools Used
Screwdriver, Pliers, Socket set, Wrench Set, Bearing press
1. Removed fuel tank and carb from tiller and cleaned out tank.
2. Installed tank and crab. Filled gas tank and ops checked carb (tiller was hard to start and had to pour a little gas down the carb). After initial start up, I let it run for 15 mins. After shutdown, I attempted an other start after 2 hours and the tiller started on the first pull.
1. Removed carrier plate assembly and discovered a bearing had come apart. Purchased a new bearing at the auto parts store and installed. This operation required the use of a press to remove the gear.
2. Installed carrier plate
3. Removed and replaced drive cable and completed a successful operation check
Did you find this story helpful?
Thanks for voting and helping fellow customers!
Load More Install Stories
OEM stands for Original Equipment Manufacturer and means the part you’re buying is sourced directly from the manufacturer who made your product. At eReplacementParts, we sell only genuine OEM parts, guaranteeing the part you’re purchasing is of better design and of higher quality than aftermarket parts.
Our product descriptions are a combination of data sourced directly from the manufacturers who made your product as well as content researched and curated by our content & customer service teams. This content is edited and reviewed internally before being made public to customers.
Our customer service team are at the ready daily to answer your part and product questions. We have a dedicated staff with decades of collective experience in helping customers just like you purchase parts to repair their products.
All our part reviews are solicited directly from other customers who have purchased this exact part. While we moderate these reviews for profanity, offensive language or personally identifiable information, these reviews are posted exactly as submitted and no alterations are made by our team.
All our customer repair instructions are solicited directly from other customers just like you who have purchased and replaced this exact part. While we moderate these reviews for profanity, offensive language or personally identifiable information, these reviews are posted exactly as submitted and no alterations are made by our team.
Based on data from past customer purchasing behaviors, these parts are most commonly purchased together along with the part you are viewing. These parts may be necessary or helpful to replace to complete your current repair.
All our installation videos are created and produced in collaboration with our in-house repair technician, Mark Sodja, who has helped millions of eReplacementParts customers over the last 13 years repair their products. Mark has years of experience in selling and repairing both commercial and residential products with a specialty in gas-powered equipment.
This data is collected from customers who submitted a repair instruction after replacing this exact part. Customers can rate how easy the repair was to complete and how long it took. We aggregate this data to provide a repair rating that allows customers to quickly determine the difficulty and time needed to perform their own repair.