


Why Read This Article?
Finish Nailer Repair - Replacing the Driver Guide (Ridgid Part # 79004001022)
Article Breakdown
Finish Nailer Repair - Replacing the Driver Guide (Ridgid Part # 79004001022)
Video
Tools & Materials
- chuck key or allen wrench set
- hammer
- needle nose pliers
- drive pin punch set
- clamp pin (Part# 648594-00)
- retainer kit (Part# 884696)

All three pins are provided in the retainer kit for this repair, and all of the repair parts for this procedure are very inexpensive as well.
This article provides steps for dismantling and reassembling Porter Cable reciprocating saw chucks, and also includes a demonstration video for this repair.
Tools needed for this repair:
- chuck key or allen wrench set
- hammer
- needle nose pliers
- drive pin punch set
- clamp pin (Part# 648594-00)
- retainer kit (Part# 884696)
(Make sure to unplug the saw before beginning this repair, or in the case of a cordless saw, remove the battery.) 1. Remove the clamp assembly "foot."
A chuck key should have come with the saw for removing the boot. If it's not available, an allen wrench set will be needed.
 2. Hammer out the retaining pin(s).
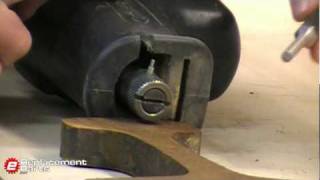
There is a small hole on the side of the clamp collar in which the retaining pin(s) sit. Using a small pin punch, carefully hammer the pin(s) until they are almost all the way out the other side of the collar.

3. Remove the retaining pin(s) the rest of the way.
From the other side of the collar, pull the emerging retaining pin(s) out the rest of the way with a pair of needle nose pliers.

4. Slide the chuck collar off.
With the retaining pins removed, the chuck collar should slide off easily.
5. Remove the round clamp pin.
A round clamp pin will be visible inside of the clamp assembly and is the part that needs to be replaced (along with the retaining pins). Remove the clamp pin by turning the saw on its side and giving it a light tap.
 The chuck assembly is now disassembled with the clamp pin removed.
[Back to top]
Steps for Reassembly
1. Insert the new clamp pin.
The chuck assembly is now disassembled with the clamp pin removed.
[Back to top]
Steps for Reassembly
1. Insert the new clamp pin.
These clamp pins are double-sided and can be installed either way.
2. Reinstall the chuck collar.
There is a spring inside of the assembly that keeps pressure on the chuck collar. When reinstalling the collar, the spring must be lined up with a small hole on the edge of the collar.
3. "Start" the retaining pin(s).
Using a pair of needle nose pliers, position the retaining pin in its hole and tap it in partway with a hammer.

4. Hammer the retaining pins in all the way.
Using a slightly oversized pin punch, hammer the retaining pins all the way back into position.
5. Reinstall the "foot" of the saw.
Replace the saw foot again, making sure to tighten it into place with the chuck key or an allen wrench set.
The saw is now reassembled.
Conclusion
Please view this article's demonstration video for additional tips on this repair, or simply for the benefit of the moving visual aid.
The retainer kit and clamp pin needed for this repair are compatible in several Porter Cable recip saw models, and can be found by clicking the links.
Otherwise, start your repair by entering your saw's model number in the "Model Number" search field at the top of this page.
