


Why Read This Article?
Finish Nailer Repair - Replacing the Driver Guide (Ridgid Part # 79004001022)
Article Breakdown
Finish Nailer Repair - Replacing the Driver Guide (Ridgid Part # 79004001022)
Video
Tools & Materials
- needle nose pliers
- screwdrivers
- #25 torx driver
- 3/4" socket and wrench
- adjustable spanner wrench
- a piece of nylon rope
Safety Guidelines
- Empty the trimmer's gas before dismantling it. Also, start the trimmer to use up remaining fuel.
Tools needed to remove a trimmer clutch:
- needle nose pliers
- screwdrivers
- #25 torx driver
- 3/4" socket and wrench
- adjustable spanner wrench
- a piece of nylon rope

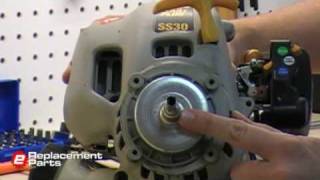
For this demonstration, we remove the clutch from a Ryobi SS30 String Trimmer, but the majority of trimmer clutches are removed in the same way.
Empty the Gas from the Trimmer
To safely remove the clutch drum and perform other repairs, all of the trimmer's fuel should be emptied before beginning.
- Open the fuel tank and safely dump any gas out.
- Pump the primer a few times to clear extra fuel from the system.
- Replace tank cap and try to start the trimmer up. If it starts, let it run until the remaining fuel is used up.
Steps for Removing a Trimmer Clutch The first objective in removing the clutch drum is to separate the trimmer shaft from its motor.
1. Remove the screws holding the shaft to the motor.
- Screws and other fasteners that hold the motor to the trimmer shaft must be removed.
For the Ryobi SS30, this means unscrewing four #25 torx screws from the motor assembly.
 [Back to top]
2. Disconnect motor wires leading to the switch.
[Back to top]
2. Disconnect motor wires leading to the switch.
- Motor wires need to be disconnected in order to completely separate the motor from the shaft.
This is best done with a couple pairs of needle nose pliers.
 [Back to top]
3. Disengage the throttle cable from the carburetor.
The throttle cable is usually held into place by a screw and a pin that connects it to the carburetor.
- Remove the screw with a screwdriver.
- Free up the pin by removing it from its hole with a pair of needle nose pliers.
 [Back to top]
(HINT:Now that the motor is completely removed from the trimmer shaft. The next step is to remove the clutch drum screw holding the clutch drum onto the motor.
This is the only tricky part involved in removing the clutch. To remove the clutch, a screw must be removed from the hole in the clutch drum that connects the drum to the motor.
To remove the clutch drum screw, the trimmer's piston must be bound first. Otherwise, turning the drum screw will only rotate the piston, and the screw will not come out.
To bind up the piston, it must first be accessed by removing the trimmer's spark plug.)
4. Remove the trimmer's spark plug to access the piston cylinder.
[Back to top]
(HINT:Now that the motor is completely removed from the trimmer shaft. The next step is to remove the clutch drum screw holding the clutch drum onto the motor.
This is the only tricky part involved in removing the clutch. To remove the clutch, a screw must be removed from the hole in the clutch drum that connects the drum to the motor.
To remove the clutch drum screw, the trimmer's piston must be bound first. Otherwise, turning the drum screw will only rotate the piston, and the screw will not come out.
To bind up the piston, it must first be accessed by removing the trimmer's spark plug.)
4. Remove the trimmer's spark plug to access the piston cylinder.
- Pull the spark plug cover off.
- Using a 3/4" socket and ratchet wrench, unscrew the spark plug and remove it

You should be able to see into the piston cylinder now. [Back to top] 5. Bind the piston with a piece of nylon rope.
The trimmer piston has to be bound, otherwise, turning the clutch drum screw to remove the clutch drum will only turn the piston.
- Stuff a short piece of nylon rope into the cylinder, leaving some hanging out so it can be easily removed.
- Slowly pull the starter cord to bring the piston up.
When you feel resistance in the starter cord, you'll know the piston is bound enough to remove the clutch drum screw.

Now the drum screw is ready to come out.
[Back to top]
6. Unscrew the clutch drum screw and remove the clutch drum.
- Unscrew the clutch drum screw, located in the hole at the base of the clutch drum.
- Clutch drum screws are regular thread, and turn counterclockwise to loosen.
- Remove the clutch drum.
For the Ryobi SS30, this screw again requires a #25 torx driver.

[Back to top]
7. Remove clutch plates.
- Using an adjustable spanner wrench, unscrew and remove the two remaining clutch plates.

 The clutch and clutch drum should now be removed, and the starter of the trimmer should also be accessible.
[Back to top]
The clutch and clutch drum should now be removed, and the starter of the trimmer should also be accessible.
[Back to top]
Conclusion
The key to removing a trimmer clutch is binding that piston up with a nylon rope. To begin your trimmer repair, visit our Trimmer Parts page to find your trimmer by manufacturer. Or, type your trimmer model number in the search field at the top of this page.
See our Finding Tool Model and Type Numbers article for more information about accurate parts searches.
Thanks for taking advantage of this and other eReplacementParts.com tool and machine information resources.
[Back to top]
What we're about.
