
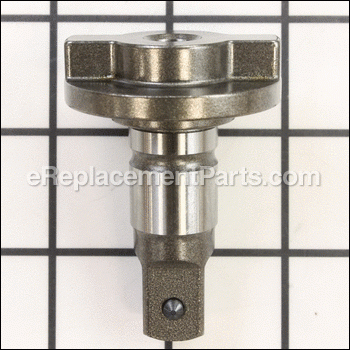
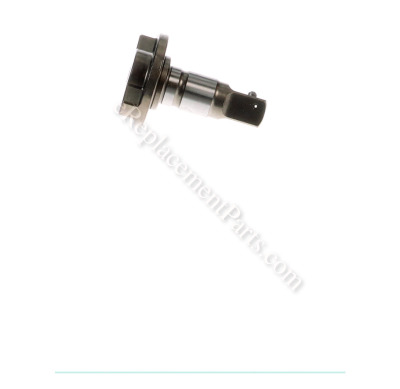

Anvil Assembly 14-73-0455
Part Number: 14-73-0455
Order within the next 11 hours
and your part ships today!
and your part ships today!
Product Information
Description:
| This is an authentic manufacturer approved replacement part specially designed for use with compatible Milwaukee impact wrench. It allows user to secure different wrenches and keys. This part is made out of metal and is sold individually. An impact driver's anvil can wear on both sides from inside the drill housing where the hammer mechanism strikes it or from the outside where it meets your bits. If this happens, you'll want to replace the anvil. Luckily, replacing the anvil is a relatively quick repair. • Remove the chuck assembly • Remove the drill housing • Separate the transmission and motor • Open the transmission housing • Remove the gears • Remove the anvil • Slide the anvil back into place • Replace the gears • Tighten the transmission housing • Place the transmission into the drill housing • Seat the bearing into the transmission • Align the motor and transmission • Replace the drill housing • Re-install the chuck |
Frequently Purchased With


Compatibility
This part is compatible with the following machines:
Products Compatibility
This item works with the following types of products:
- • Impact Wrench
Questions & Answers for Anvil Assembly
No questions have been asked yet
Repair Instructions: Submitted by Customers Like You
5 of 5 people found this instruction helpful
Tool Type:
Impact Wrench
Parts Used:
Repair Difficulty:
Medium
Time Spent Repairing:
30-60 minutes
Tools Used:
Screwdriver, Adjustable Wrench
Replaced anvil
I replaced the anvil. Would have been easy but I let the reduction gears come apart. Put tool on table anvil up remove 4 screws holding nose cap on. Don't let the anvil come off with cap hold it down slide cap over it so gears don't come apart. There are 2 sets of planet gears in there. If they come apart use wheel bearing grease to hold them on stems work them in slowly take your time turning to let the teeth engage. Turn anvil to make sure no binding before plugging tool up. Use impact sockets with hole lined up with pin or you will brake the anvil again. Works good now.
Did you find this story helpful?
Thanks for voting and helping fellow customers!
Tool Type:
Impact Wrench
Parts Used:
Repair Difficulty:
Easy
Time Spent Repairing:
Less than 15 minutes
Tools Used:
Screwdriver
Tip broken off of anvil
1. Remove front housing
2. Remove and replace anvil
3. Replace front housing.
2. Remove and replace anvil
3. Replace front housing.
Did you find this story helpful?
Thanks for voting and helping fellow customers!
Tool Type:
Impact Wrench
Parts Used:
Repair Difficulty:
Easy
Time Spent Repairing:
Less than 15 minutes
Tools Used:
Screwdriver
Busted the driver "anvil"
Followed the instructions on the other reviews. Put the drill so the driver and cap are vertical remove the 4 screws at the base of the cap. Put your finger on the driver "anvil" and carefully lift the cap without knocking the parts assembled under the cap. Gently lift the broken anvil and grease the new one. Maybe grease the other parts by simply smearing some on them gently. Place the new anvil on top in the same position you took the old one off. Gently reinstall the cap and screws. It's a peach job if you don't disrupt the other parts as you remove the cap.
Did you find this story helpful?
Thanks for voting and helping fellow customers!
Reviews
3 Reviews
Average Rating (out of 5):
Click to filter by ratings:
5 stars
2
4 stars
1
3 stars
0
2 stars
0
1 stars
0
< PREV
- 1
Easy fit up. Perfect fit and right part! Came quickly!
Right part, fit perfectly, easy fix.
Guest -
May 19, 2022
Verified Purchase
great company great service
bought from this company multiple time. always a good experience. i highly recommend them
Robert -
August 28, 2020
Verified Purchase
Part fit
It was an easy fix. Part was correct
Guest -
February 1, 2021
Verified Purchase
Verified Purchase
eReplacementParts Team
< PREV
- 1
Product Information